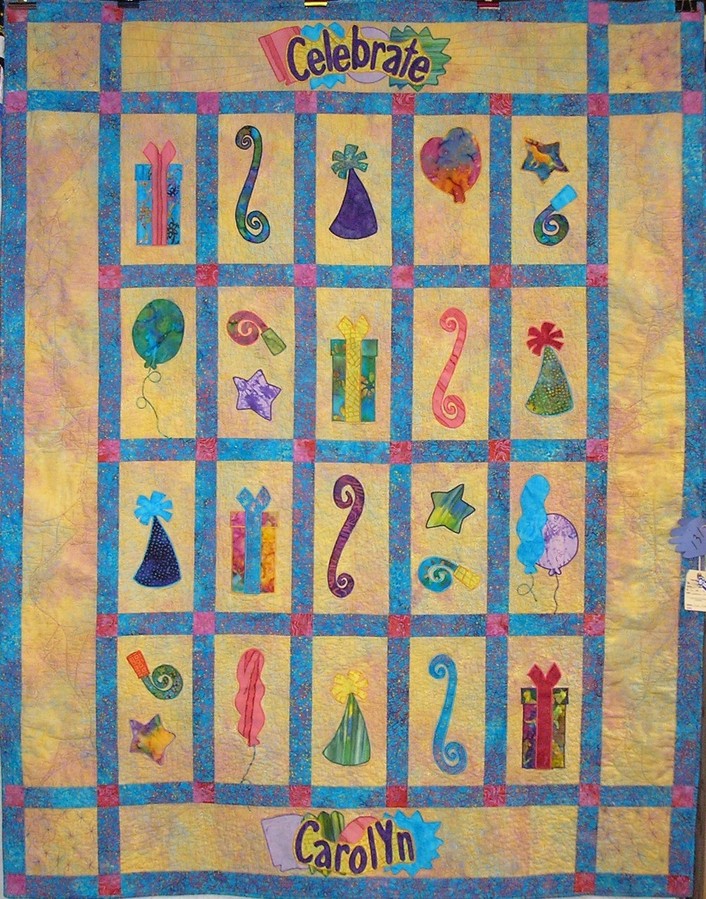
Login Email or Screen Name:
Password:
Can't Login?
The Quilt Show on Twitter
The Quilt Show on Facebook
Daily BlogWatch ShowsAlex & RickyBOMClassroomsThe ForumContestsFeaturesProjectsQuilt GalleryShoppeHelpMy Account
HomePuzzles OnlyJoin FreeSubscribeContact Us
Bernina Educational Videos


Gammill Longarm Videos


Accuquilt Videos


Site Sponsors:
 
 
The Daily Blog


Two of Us 2013 BOM  Sharon Schamber Videos  
 
My Wonderful Sewing Table
August 17, 2010
Back to Top
Posted in Ricky  |   19 Comments  |   Submit a Comment

3005_sewingtable.jpg

This is a follow up to yesterday's post about my new "clean" sewing studio. 

There were suggestions that I utilize what's left of my wall space for threads - however, the available wall space is reserved for quilts when we use the room for video taping. There is a larger wall behind where I sit and sew (if you watch Bernina videos, you'll see there is always a quilt behind Nina) so I can't utilize that area for organizational space. Also, it's deceptive, but there is not much room between the table and the wall (see the photo below). Move the table you say? We'll no - and here's why.

The very cool sewing table (custom made by Justin and myself) stands at cutting and pressing height. However, notice the chair in front of the machine. It is at the right height for sitting and sewing. The secret is a raised platform for the chair. The platform is built to extend under the table in front of the chair and it extends to the right of the table and chair and butts to the wall - so this determines where the table must be. If I were to move the table away from the wall - I'd also have to move the platform thus creating a gap that would be problematic. The right and bottom of the platform (see the illustration above) butt up to the wall.

The only thing that you have to get used to are the steps leading onto the platform, but stepping up and down becomes second nature in a short time and you totally forget about the steps. WARNING: If you choose to utilize this design with a platform, you must pay attention the the steps.

I love the design, especially for studios located in smaller bedrooms, because you could have the table in the center of the room rather than being pushed up to a wall. There is lots of storage space under the table. I plan to purchase more Elfa wire baskets for under the table so I can better utilize that space. Include a couple of bistro chairs for visitors.

Any carpenter could build something like this. The two most important measurements are:

1. your preferred cutting and pressing height

2. your comfortable height for sitting and sewing. The platform height is the difference between the two - in most cases - 5" to 7".

Yes, the clean studio got me itching to sew - so I took an hour and worked on multi-colored seminole borders for a project that I've had waiting in the wings.

P.S. You might be interested to know that the legs for the table are bannisters and the top is wood flooring on top of a plywood base. The edges are beveled and if I made another, I would slighty round the corners to better protect the quilts when quilting.

3005_sewingstudio_text.jpg


Previous BlogAll BlogsFinish
 
 
Blog Archives
 
May 2013
Back
Follow TheQuiltShow on Pinterest
Search this Site
Purchase a Membership

Basic Membership

Redeem a Gift Certificate

Purchase a Gift Certificate for a Friend

Purchase a Series DVD
Sharon Schamber Videos

Click Here to Watch this Show
 The Quilt Show Contests:
Click for more details
 MyAds:
Pacific West Quilt Show
August 23-25, 2013
Tacoma, WA
Vicki Welsh Hand Dyed Fabric
Online and Custom Order
Gradients, Shibori and more
Sauders Online Quilt Shop
Quality discounted Fabric
Lancaster County Pa
Quilt Kit Market
Quilt Kits, Precuts, Fabric
Visit us online store today!
THE QUILTING GARDEN
FIND SAVINGS UP TO 50%
IN THE BARGAIN SHED
Quilt Camp So Calif 7/2013
National/Local Teachers
Costa Mesa, CA

Advertise on The Quilt Show
 Travel Opportunities:
14 Day Route 66 Bus Tour with Ricky Tims